Van Solar Setup Canada: Everything You Need to Know Before You Hit the Road
If you are planning to live or travel in a van across Canada, one of the first things you need to figure out is power. How do you charge your phone, run your fridge, power your lights, and keep your laptop going without plugging into a campsite every night?
The answer is solar power. A well built van solar setup in Canada gives you the freedom to park anywhere, from the Rocky Mountains to the shores of Nova Scotia, and still have all the electricity you need.
This guide is for beginners. We will walk through everything, what gear you need, how it all connects, what it costs, and what to watch out for in the Canadian climate.
Why Solar Makes Sense for Canadian Van Life
Canada is a big country. A lot of the best places to park your van, national parks, logging roads, Crown land, do not have electrical hookups. If you want to stay off-grid for days or weeks at a time, you need your own power source.
Solar is the most popular choice for van lifers because it is silent with no generator noise, it is free energy once you pay for the gear, it is low maintenance with no fuel to buy and no engine to service, and it works everywhere as long as there is some daylight.
Yes, Canadian winters can be cloudy and short on sunlight. We will talk about that. But for most of the year, and especially in the summer months, solar works extremely well across Canada.
The Basic Parts of a Van Solar Setup
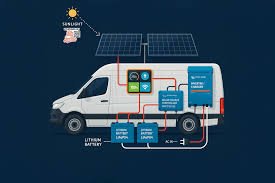
Before you start buying parts, you need to understand how a solar system works. There are four main components.
Solar Panels
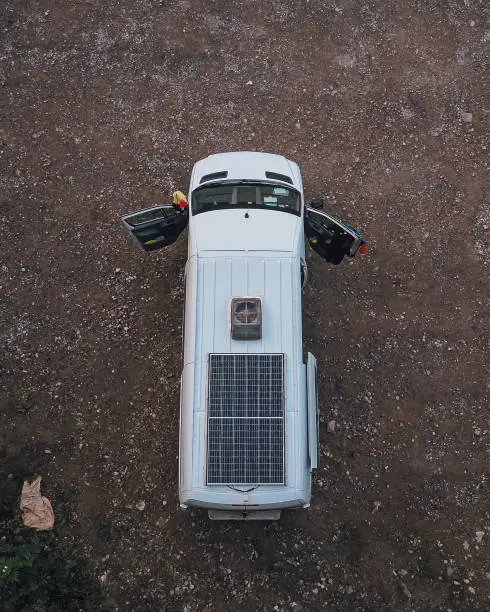
These go on the roof of your van. They capture sunlight and convert it into electricity. The electricity they produce is DC power, which stands for direct current.
Solar panels are rated in watts. A 100W panel produces up to 100 watts per hour under perfect conditions. In the real world, you will get less, maybe 60 to 80 percent of the rated output on a good day.
For most van setups in Canada, people use between 200W and 600W of solar panels total.
Charge Controller
The electricity from your solar panels goes through a charge controller before it reaches your battery. The charge controller regulates the voltage and current to protect your battery from overcharging.
There are two types. PWM stands for Pulse Width Modulation and is the cheaper option that works fine for small setups. MPPT stands for Maximum Power Point Tracking and is more efficient, making it better for larger setups and low-light conditions.
In Canada, where you often deal with partial sun or overcast skies, an MPPT charge controller is worth the extra cost.
Battery Bank
Your battery bank stores the electricity your solar panels produce. You draw from it when you need power, at night, on cloudy days, or whenever you are using more than your panels are producing.
There are two main battery types used in vans. AGM batteries, which stands for Absorbed Glass Mat, are cheaper upfront but heavier with a shorter lifespan. Lithium batteries, also known as LiFePO4, cost more upfront but are lighter, last much longer, and perform better in cold weather.
Most serious van lifers in Canada choose lithium batteries. We will talk more about this later.
Battery capacity is measured in amp-hours. A 100Ah lithium battery at 12V gives you about 1,200 watt-hours of usable power.
Inverter
Your solar panels and battery store DC power. But most household devices like laptops, blenders, and some phone chargers run on AC power, which stands for alternating current, just like your home outlets.
An inverter converts DC power from your battery into AC power you can use. Inverters are rated in watts. A 1,000W inverter can power devices that use up to 1,000 watts at once.
How to Size Your Solar System
This is where most beginners get confused. How much solar do you actually need?
The answer depends on how much power you use every day. Start by making a list of your devices and how long you use them each day.
Here is a simple example. A 12V fridge running at 45W for 24 hours uses 480 watt-hours. LED lights at 20W for 4 hours use 80 watt-hours. A laptop at 65W for 3 hours uses 195 watt-hours. Phone charging at 15W for 2 hours uses 30 watt-hours. A fan at 30W for 6 hours uses 180 watt-hours. That adds up to about 965 watt-hours per day.
In this example, you need roughly 1,000 watt-hours per day. To cover that with solar, you would want at least 300 to 400W of panels, assuming 4 to 5 peak sun hours per day, which is reasonable in most of Canada during summer.
You would also want a battery bank that can store at least 1,000 to 1,500 watt-hours of usable power, so you can get through cloudy days or nights without running out.
Solar in Canadian Winter: What to Expect
Let us be honest, winter solar in Canada is challenging. The days are shorter, and in December you might only get 3 to 4 hours of weak sunlight. Snow on your panels blocks sunlight entirely until you clear it. Cold temperatures reduce battery capacity, and the sun stays low on the horizon all day, which lowers panel efficiency.
This does not mean solar is useless in winter. It just means you need to plan for it.
Install more panels than you think you need, since 400 to 600W gives you a solid buffer. Use an MPPT charge controller because it pulls more power out of low-light conditions. Clear snow off your panels daily when it snows. Tilt your panels if possible to catch the low winter sun.
Also have a backup charging method ready. A DC-DC charger, also called a battery-to-battery charger, lets you charge your van battery while driving, which is a lifesaver on dark winter days.
Many full-time van lifers in Canada simply head south or to the BC coast in winter, where conditions are more solar-friendly.
Recommended Van Solar Setup for Canada
Here is a solid starter setup that works well for most Canadian van lifers.
For a budget setup costing roughly 800 to 1,200 CAD, you would want 2 panels at 100W each, a 30A MPPT charge controller, a 100Ah AGM battery, and a 1,000W pure sine wave inverter.
For a mid-range setup in the 2,500 to 3,500 CAD range, go with 400W of solar using two 200W panels, a 40A MPPT charge controller, a 100Ah lithium LiFePO4 battery, a 2,000W pure sine wave inverter, and a DC-DC charger for alternator charging.
For a full off grid setup running 5,000 to 8,000 CAD, you would want 600W of solar using three 200W panels, a 60A MPPT charge controller, a 200Ah lithium battery bank, a 3,000W pure sine wave inverter, a DC-DC charger, and a battery monitor.
Prices vary depending on where you buy. Canadian retailers like Renogy Canada, Princess Auto, and Amazon.ca are popular sources.
Wiring: The Basics
You do not need to be an electrician, but you do need to understand a few basics.
Use the right wire gauge. Undersized wire can overheat and cause fires. Use a wire gauge calculator based on the amps your system draws and the length of the wire run.
Fuse everything. Every wire coming off your battery should be fused. This protects your system if there is a short circuit.
Keep wire runs short. The longer the wire, the more voltage drop you get. Try to mount your charge controller, battery, and inverter close together.
Ground properly. Connect the negative side of your battery to your van’s chassis. This is your common ground.
If you are not confident with wiring, hire a qualified 12V electrician to check your work, or at least have someone experienced review it before you power everything on.
Common Mistakes to Avoid
Buying cheap panels from unknown brands is one of the most common mistakes. Stick to brands with real warranties. Renogy, Rich Solar, and Victron are all well-regarded.
Undersizing your battery is another big one. Your battery is the heart of the system, and skimping here means you will run out of power constantly.
Forgetting about wire losses is also easy to do. Always size your wires generously and use quality connectors.
Not monitoring your power is a mistake that catches a lot of people off guard. A battery monitor like the Victron BMV 712 tells you exactly how much power you have left, what is coming in, and what is going out. It is one of the best investments in a van solar system.
Finally, do not ignore the charge controller. A good MPPT charge controller, especially in Canadian conditions, can increase your solar harvest by 20 to 30 percent compared to a cheap PWM unit.
Final Thoughts
Setting up solar in your van is one of the best things you can do for your van life experience in Canada. It gives you freedom, independence, and the ability to camp in some truly incredible places without worrying about where your next charge is coming from.
Start by calculating your power needs, choose quality components, and do not rush the build. Many van lifers upgrade their systems over time as they learn what they actually need on the road.
The Canadian landscape is waiting. With the right solar setup, you will have all the power you need to explore it.