How Much Solar Do You Need for Van Life in Canada and How to Set Up Your Charge Controller and Inverter
One of the most common questions from people building their first van is how many solar panels they actually need. It sounds simple, but the honest answer is that it depends. It depends on what devices you use, how long you use them, where you park, and what time of year you are traveling.
The good news is there is a straightforward way to figure it out. Once you know your solar needs, choosing and setting up your charge controller and inverter becomes much easier.
This guide covers all three: sizing your solar panels, choosing a charge controller, and setting up your inverter.
Part 1: How much solar do you need for van life in Canada?
Step 1: Calculate Your Daily Power Use
Start by listing every electrical device in your van and estimate how long you use each one per day.
Here is a sample calculation for a typical van lifer. A 12V compressor fridge running at 45W average for 24 hours uses 480 watt-hours. LED lighting at 15W for 5 hours uses 75 watt-hours. A laptop at 65W for 4 hours uses 260 watt-hours. Phone charging at 15W for 2 hours uses 30 watt-hours. A diesel heater fan at 10W for 8 hours uses 80 watt-hours. A water pump at 60W for 15 minutes uses about 15 watt-hours. That brings the total to roughly 940 watt-hours per day.
So this person uses approximately 1,000 watt-hours or 1 kWh per day.
Step 2: Account for Peak Sun Hours
Solar panels do not produce their full rated output all day. They only produce close to their rated power during peak sun hours, which is when the sun is strong and direct.
In Canada, average peak sun hours vary by location and season. Vancouver and Calgary see 5 to 7 hours in summer and around 2 to 3 hours in winter. Toronto and Halifax average 4 to 5 hours in summer and closer to 2 hours in winter.
For planning purposes, most Canadian van lifers use 4 peak sun hours as a conservative average. According to Natural Resources Canada, solar potential varies significantly across the country, so it is worth checking the data for the regions you plan to travel through most.
Step 3: Do the Math
Divide your daily need by your peak sun hours to get your required panel watts.
Using our example, 1,000 watt hours divided by 4 hours equals 250W of solar panels needed. You should then add a 25 to 30 percent buffer for real world inefficiencies like shading, heat, wire losses, and non-ideal panel angles. That brings the number up to roughly 325 to 350W.
In practice, most van lifers in Canada do well with 300 to 400W of solar panels for a fridge and laptop lifestyle.
Step 4: Consider Your Battery Storage
Your panels need to refill your battery by the end of the day. If you have a 200Ah lithium battery with about 2,400 watt-hours of usable capacity, you want enough solar to recharge it from a typical partial depletion of around 1,000 watt-hours while also covering your daytime usage.
A simple rule of thumb is to take your battery capacity in watt-hours and divide by 5 to get your rough minimum solar watts. A 200Ah battery at 2,400 watt-hours needs at least 480W to charge comfortably in a day, though in summer with good sun, 300W will usually get the job done.
Part 2: Choosing Your Charge Controller
What a Charge Controller Does
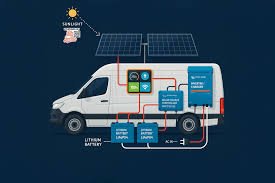
The charge controller sits between your solar panels and your battery. Its job is to take the electricity from your panels, which varies constantly depending on sunlight, and convert it into clean steady power that safely charges your battery.
Without a charge controller, your panels would overcharge and destroy your battery within weeks.
PWM vs MPPT: Which One Do You Need?
PWM stands for Pulse Width Modulation. PWM controllers work by rapidly switching the connection between your panels and battery on and off. They are simple, cheap, and reliable, but they waste some of your panel’s potential output. PWM works best when your panel voltage closely matches your battery voltage, such as a 12V panel paired with a 12V battery. They are best suited for small setups under 200W, tight budgets, and simple 12V systems.
MPPT stands for Maximum Power Point Tracking. MPPT controllers are smarter. They constantly monitor the output of your panels and adjust the electrical load to keep them operating at their most efficient point. MPPT controllers can be 20 to 30 percent more efficient than PWM, especially on cloudy days, in cold temperatures when panel voltage is high, and in setups where panel voltage is much higher than battery voltage.
For Canadian van life, MPPT is almost always the right choice. Canada’s overcast skies and cold winters are exactly the conditions where MPPT earns its keep.
How to Size Your Charge Controller
The charge controller must handle the maximum current from your solar panels. Divide your total panel watts by your battery voltage to get the required controller amps.
For example, 400W of panels on a 12V system gives you 33.3 amps. Always round up and add headroom, so a 40A controller is the right call here.
A 20A controller handles up to around 260W on a 12V system. A 30A handles up to 390W. A 40A handles up to 520W. A 60A handles up to 780W. Always buy slightly more capacity than you currently need so you have room to add panels later.
Top MPPT Charge Controllers for Van Life
The Victron SmartSolar MPPT is available from 10A up to 100A, has Bluetooth built in, and works with Victron’s app and monitoring ecosystem. Pricing runs roughly 120 to 400 CAD depending on size.
The Renogy Wanderer and Rover MPPT are solid entry-level options available on Amazon.ca with good performance for the price, running around 80 to 200 CAD.
The EPever Tracer MPPT is popular among DIY builders and offers good efficiency and temperature compensation at 80 to 180 CAD.
For most Canadian van setups, a Victron SmartSolar 100/30 or 100/40 is the go-to recommendation. The built-in Bluetooth monitoring alone makes it worth the price.
Setting Up Your Charge Controller
Mount it in a ventilated spot because charge controllers generate heat. Do not seal them in an airtight space.
Always connect in the right order. Connect the battery to the controller first, then connect the solar panels to the controller second. Never connect the panels before the battery as this can damage the controller.
Set the battery type correctly. Most MPPT controllers let you choose between AGM, flooded lead-acid, and lithium. Always match this setting to your actual battery.
For lithium batteries, set the absorption voltage to 14.2 to 14.6V and the float voltage to 13.6V. Some lithium battery manufacturers recommend disabling float entirely. Always check your battery manufacturer’s recommended settings before finalizing anything.
Once everything is connected, check the display or app to confirm your controller is reading panel voltage and showing charging current.
Part 3: Setting Up Your Inverter
What an Inverter Does
Your battery stores DC power, which stands for direct current. Most household appliances including laptops, phone charger bricks, blenders, and hair dryers run on AC power, which stands for alternating current, just like your home outlets.
An inverter converts DC power from your battery into AC power for your devices.
Modified Sine Wave vs Pure Sine Wave
Modified sine wave inverters produce a stepped waveform that approximates AC power. They cost less but some devices do not work well with them, including sensitive electronics like certain laptops and medical devices, motors that can run hotter and louder than intended, and some LED dimmers and speed controls.
Pure sine wave inverters produce smooth AC power identical to what comes out of a wall outlet at home. Every device works correctly with them.
Always use a pure sine wave inverter. The price difference between the two has shrunk considerably in recent years, and the peace of mind is worth it.
How to Size Your Inverter
Your inverter must handle the peak wattage of everything you run through it, including startup surges. Some devices draw significantly more power when starting than when running. A 150W fridge might surge to 400W at startup. A 300W air compressor might surge to 900W.
Add up the running watts of everything you might run at once, then double it for safety. For example, a laptop at 65W plus a phone charger at 20W plus a small blender at 300W equals 385W running. Double that and you get 770W, so a 1,000W inverter is the right minimum.
A 500W inverter handles phones, laptops, and small devices. A 1,000W inverter covers most van setups and handles laptops, blenders, and small appliances. A 2,000W inverter is suitable for power tools, larger cooking appliances, and coffee makers. Anything above 3,000W is for full-time living with more demanding power needs.
Inverter Installation Tips
Wire your inverter directly to your battery. The inverter draws high current and needs short thick cables, typically 2/0 AWG or larger for a 2,000W unit, connected right at the battery terminals.
Add a large fuse close to the battery. This is a critical safety step. Use an ANL fuse or similar inline fuse rated just above the maximum current draw of your inverter.
Mount it near the battery and keep the cable run under 3 feet if possible. Every extra foot of cable loses efficiency.
Add a remote switch. Most inverters support a remote on/off switch. Mount it somewhere accessible so you can turn the inverter off when you do not need it since it draws a small amount of idle power around the clock otherwise.
Make sure it has ventilation. Inverters get hot and should never be installed in an enclosed space without airflow.
Popular Inverters for Van Life
The Renogy 1,000W and 2,000W pure sine wave inverters are widely available in Canada with a good price-to-quality ratio and a remote switch included. Pricing runs around 150 to 300 CAD.
The Victron Multiplus is the premium option. It includes a built-in battery charger that charges from shore power when available, and it can be fully programmed and monitored through the Victron system. Pricing runs 700 to 2,000 CAD.
The AIMS Power pure sine wave inverter is popular in DIY van builds and comes in a wide range of sizes at 150 to 400 CAD.
Putting It All Together
Start by calculating your daily power needs by listing all your devices and usage hours. Size your solar panels based on your daily needs divided by peak sun hours, then add a 25 to 30 percent buffer. Choose an MPPT charge controller sized for your panel wattage with room to expand later. Install the charge controller correctly by connecting the battery first and the panels second. Choose a pure sine wave inverter sized for your peak load, wire it directly to the battery with proper fusing, and make sure it has ventilation.
A properly sized and installed system, even a modest 300W solar setup with a 40A MPPT controller, a 100Ah lithium battery, and a 1,000W inverter, can power a comfortable van life across most of Canada for most of the year.
The key is to do your math before you buy anything. Know what you need, then buy what fits.
Frequently Asked Questions
How many solar panels do I need for van life in Canada?
Most van lifers running a fridge, laptop, and basic devices do well with 300 to 400W of solar panels. If you travel in winter or spend time in cloudier provinces like BC or Nova Scotia, leaning toward 400W gives you a useful buffer.
What is the difference between PWM and MPPT charge controllers?
PWM controllers are simpler and cheaper but less efficient. MPPT controllers cost more but can extract 20 to 30 percent more power from your panels, especially in low light conditions. For Canadian van life, MPPT is the better choice in almost every situation.
Do I need a pure sine wave inverter for van life?
Yes. A pure sine wave inverter works safely with all devices including laptops, sensitive electronics, and motors. Modified sine wave inverters are cheaper but can damage or shorten the life of certain devices. The small price difference is not worth the risk.
How do I know what size inverter I need?
Add up the running watts of every device you might use at the same time, then double that number to account for startup surges. That gives you your minimum inverter size. Most van setups are well covered by a 1,000W pure sine wave inverter.
Is 200Ah of lithium enough for full-time van life in Canada?
For most people running a fridge, lighting, and a laptop, 200Ah of lithium gives you around 2,400 watt-hours of usable power. That covers a full day of typical usage with a comfortable buffer for cloudy days. If you work remotely with multiple devices, moving up to 300Ah gives you more peace of mind. The Canadian Renewable Energy Association has solid resources on energy storage sizing if you want to go deeper on the numbers.
Where can I learn more about off-grid power regulations in Canada?
If you are building a more serious electrical system and want to make sure it meets Canadian standards, the Electrical Safety Authority is a good starting point for understanding what applies to vehicle-based electrical builds in Ontario and other provinces.