
Beginner Van Build Guide How to Build Your First Van in Canada
Building your first van feels overwhelming before you start. You look at finished builds online and wonder how anyone gets from an empty cargo van to something that liveable.
The truth is that every one of those builders started exactly where you are now. They figured it out step by step, made mistakes along the way, and ended up with a home on wheels. This beginner van build guide is designed specifically for Canadians who are starting from zero no construction background, no van conversion experience, and no idea where to begin.
Before You Buy a Single Material
The most important step happens before you touch a saw or buy a sheet of plywood. Answer these questions first:
• Will this van be for weekend trips, part time travel, or full time living?
• Will you be travelling in winter across Canada?
• What is your realistic budget?
• How much time do you have to build?
Write down your answers. Then sketch a simple floor plan on paper showing where your bed, kitchen, and storage will go before buying anything.
Stage One Choose Your Van
Ford Transit : The most beginner friendly van to build in Canada. Dealerships service them in every Canadian city. Parts are widely available. The high-roof version gives you comfortable standing height.
Mercedes Benz Sprinter: Better resale value and slightly more interior width than the Transit. Higher purchase price and more expensive repairs.
RAM ProMaster: The most affordable high roof option in Canada. Front wheel drive helps in winter. Interior is boxy and easy to build in.
Have the van inspected by an independent mechanic before purchasing. Check the roof and floor for rust these are the hardest areas to repair after your build is complete.
Stage Two Clean and Prep
Remove everything from the interior factory flooring, any shelving or partitions, plastic trim panels along the lower walls. Inspect every surface for rust. Clean the entire interior with a degreaser. Seal any existing holes in the floor or walls with self tapping screws and waterproof sealant.
Stage Three Insulate
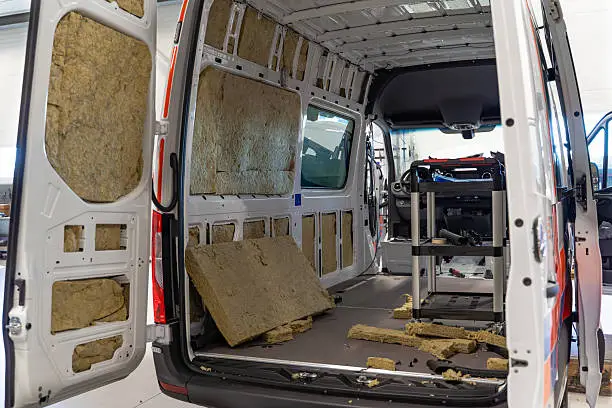
Step 1 Apply spray foam to all ribs and edges: Cover every rib with spray foam in a can, filling gaps and irregular shapes completely. Let it cure, then trim the excess flush.
Step 2 Cut and fit Polyiso rigid foam boards: Polyiso gives you the highest R-value per centimetre of any rigid insulation. Cut boards to fit the flat sections between ribs. Seal all edges and joints with foil tape.
Step 3 Add a vapour barrier: On the warm interior side of your insulation, add a vapour barrier layer. This prevents warm moist air from migrating into the wall cavity and condensing on the cold metal.
Step 4 Insulate the floor: Before your subfloor goes in, lay a layer of 25mm rigid foam across the entire van floor. This reduces cold coming up through the floor in winter and adds noise reduction while driving.
Step 5 Ceiling last: Apply spray foam to the overhead ribs first, then fit insulation batts between ribs. Many builders use Thinsulate for the ceiling because it is thin, flexible, and easy to work with overhead.
Stage Four Subfloor and Flooring
Build your subfloor from 12mm or 18mm plywood. Screw it directly to the van floor through the insulation layer using self tapping screws into the metal floor ribs. Level any low spots with thin strips of plywood before laying the final floor. Finish with waterproof vinyl plank flooring clicked together on top of the subfloor.
Stage Five Electrical Rough In
Before walls and cabinetry go in, run all your electrical wiring. Common circuits in a beginner van build guide:
• Lighting circuit
• Fridge circuit
• USB and 12V outlet circuit throughout van
• Inverter circuit
• Shore power inlet to battery charger
Run all wires but leave them unterminated at both ends. Label every wire at both ends before closing the walls. Use wire gauge appropriate to the current each circuit will carry.
Stage Six Wall Liners and Ceiling
Cedar or pine tongue-and-groove panelling: Warm, natural look. Relatively lightweight. Requires finishing with oil or varnish to prevent moisture absorption.
Thin plywood (6mm): Cheaper than wood panelling, easy to work with, takes paint well. Paint with a water-resistant finish.
FRP panels: Fibreglass reinforced plastic panels used in commercial applications. Waterproof, easy to clean, very durable.
Install your roof vent fan before the ceiling liner goes in. The Maxxair Deluxe or Fan Tastic Vent are the two most reliable options used by Canadian vanlifers.
Stages Seven to Ten Bed, Kitchen, and Final Electrical
Build the bed platform from 18mm plywood and 2×4 framing. Include pull-out drawer boxes under the platform using heavy-duty drawer slides. Test the platform for stability before adding weight it should support at least 200 kilograms without flexing.
Build your kitchen cabinets from lightweight plywood using pocket screws and wood glue. Install the propane stove, connect the water pump and sink plumbing, and fit your fridge into its dedicated space.
With all cabinetry in place, complete the electrical connections. Mount the solar charge controller, battery, and inverter in an accessible location under the bed platform. Test every circuit before closing up any remaining panels. Install your diesel heater at this stage.
Beginner Mistakes to Avoid
• Buying everything before planning materials pile up and you waste money on things that do not fit your final design
• Finishing walls before testing electrical always test every circuit before closing walls
• Skimping on insulation in Canada, there is no such thing as too much insulation
• Forgetting to leave access panels build small removable panels wherever important components are hidden
Frequently Asked Questions
How much does a beginner van build cost in Canada?
A basic functional build done as a DIY project costs $3,000 to $7,000 in materials. A more complete build with quality electrical, a diesel heater, and a compressor fridge typically runs $8,000 to $15,000.
How long does a first van build take?
Most first time builders working weekends complete a functional van in two to four months. Full time builders working daily can finish a basic build in three to five weeks.
What is the most important thing to get right in a Canadian van build?
Insulation, without question. Every other system heating, electrical, water works better and more efficiently when your van is properly insulated for Canadian conditions.
Conclusion
Your first van build will not be perfect. Things will not fit exactly as planned, you will wish you had done some things differently, and you will discover creative solutions to problems you did not anticipate. That is completely normal.
What matters is that you build something functional, get on the road, and start learning from actual vanlife experience. Start with a plan, work through each stage methodically, and do not let the scale of the project stop you from beginning.