Camper Van Conversion Canada Complete Beginner Guide for 2026
Converting a cargo van into a livable home sounds intimidating the first time you look at an empty metal box. No insulation. No bed. No kitchen. Just bare metal walls and a rubber floor mat.
But thousands of Canadians have done exactly this and many of them had zero construction experience before they started. A camper van conversion in Canada is one of the most rewarding DIY projects you can take on, and it does not require a workshop full of tools or a professional trades background.
This guide covers the complete conversion process from start to finish: what to buy, how to build it, and how to avoid the mistakes that cost beginners the most time and money.
Why Convert a Van in Canada?
Canada has a unique vanlife culture shaped by its geography. The country offers Crown land camping, thousands of kilometres of scenic highway, and national parks that rival anywhere in the world. A converted van gives you the freedom to access all of it without paying for hotels or campsites every night.
Beyond travel, the rising cost of rent in Canadian cities has pushed many people toward van living as a full time housing alternative. A well built camper van conversion in Canada can cut your monthly living expenses dramatically while giving you flexibility that no apartment can match.
Step 1 Choose and Prepare Your Van
Before a single piece of insulation goes in, you need the right starting point.
Ford Transit: The most popular choice. High roof models offer a standing height of around 6 feet 3 inches inside. Parts are available at Ford dealerships in every city in Canada.
Mercedes Benz Sprinter Exceptional build quality. More expensive to buy and maintain, but the interior dimensions are slightly better than the Transit.
RAM ProMaster Front-wheel drive is a genuine advantage on snow and ice, which makes this a smart choice for Canadian winters. Wider interior than both the Transit and Sprinter.
Once you have your van, do these things before building anything:
• Fix any rust, leaks, or mechanical issues first
• Clean the interior thoroughly
• Remove any factory flooring, shelving, or panels
• Identify and seal any existing holes in the body where moisture can enter
Step 2 Plan Your Layout
The biggest mistake beginners make is skipping the planning phase and starting to build immediately. Spend time on your layout before purchasing any materials.
Key questions to answer before building:
• Will you sleep lengthwise or across the van?
• Do you need to work from the van, requiring a dedicated desk space?
• Will you travel solo, as a couple, or with pets?
• How much kitchen space do you realistically need?
Sketch your layout on paper or use a free tool like SketchUp before cutting a single board.
Step 3 Insulate Properly for Canadian Conditions
Canada makes insulation a critical priority rather than an afterthought. Your conversion needs to handle genuine cold.
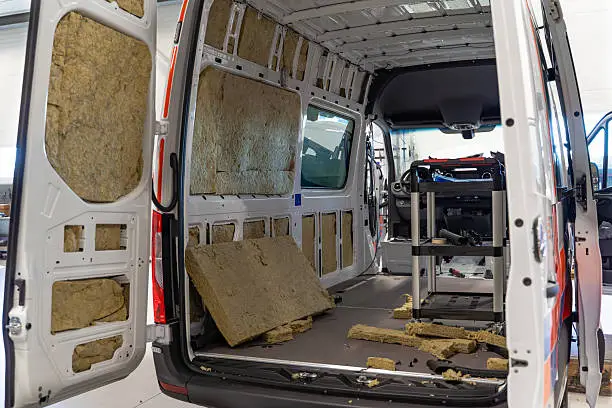
Ceiling first: Apply spray foam to all the metal ribs and irregular areas first, sealing every gap where cold can bridge through metal. Then lay Polyiso rigid foam boards between the ribs.
Walls: Cut rigid foam boards to fit between each rib section. Seal edges with spray foam. Pay close attention to the wheel wells.
Floor: Lay rigid foam directly on the van floor before your subfloor goes on. This also helps with road noise significantly.
Condensation control is where many Canadian van conversions fail. Use a vapour barrier on the warm side of your insulation combined with a breathable insulation material on the outside.
Step 4 Build the Subfloor and Flooring
Use 12mm or 18mm plywood cut to fit the van floor. Many builders use two layers, one thin sheet for leveling and a thicker sheet on top for strength. Finish the surface with vinyl plank flooring, which handles moisture well and looks clean inside a van.
Step 5 Build the Bed Platform
The bed is the centrepiece of your conversion. Build it from 18mm plywood and 2×4 framing. Build drawer slides or hinged access into the platform to use the space underneath for storage. This is the most valuable storage real estate in the entire van.
Step 6 Electrical System
The electrical system is where most beginners feel most uncertain. Work through it methodically and it becomes straightforward.
• Solar panels: Two 200 watt monocrystalline panels give you 400 watts total
• Charge controller: Use an MPPT controller for better efficiency in Canadian winters
• Battery bank: Lithium LiFePO4 is the correct choice for Canada
• Inverter: A 2000 watt pure sine wave inverter handles most vanlife needs
• Shore power inlet: Install a 30 amp inlet for campground hookups
Always fuse every circuit. Electrical fires in vans are serious and almost always caused by under-fused or improperly wired systems.
Step 7 Ventilation, Kitchen, and Heating
A roof vent fan removes moisture from cooking and breathing, prevents condensation, and makes summer nights bearable.The Maxxair Deluxe and Fan Tastic Vent are the two most popular choices among Canadian vanlifers.
For the kitchen, a 2 burner propane stove, a 12V compressor fridge, and a 20 to 40 litre fresh water tank with a 12V pump covers most needs efficiently.
Install a diesel air heater before the first cold night. A budget Chinese diesel heater costs $150 to $200 CAD and heats a van effectively to -30°C outside. The installation involves mounting the unit, running a fuel line, and running inlet and exhaust pipes through the van floor well within DIY capability.
Common Mistakes to Avoid
• Skipping the vapour barrier leads to mould inside walls within months of Canadian winter driving
• Under sizing the battery size your bank for two to three days without solar input
• Building too heavy overloaded vans handle poorly and wear out suspension faster
• Not testing systems before finishing walls fix problems before closing up
Frequently Asked Questions
How long does a camper van conversion take in Canada?
A basic functional conversion takes two to four weekends. A full custom build takes two to four months working on weekends. Most people underestimate the time required to build an extra buffer on every stage.
Do I need permits for a van conversion in Canada?
No permits are required to convert a cargo van for personal use. If you plan to rent it commercially, different rules may apply depending on your province.
What tools do I need for a basic conversion?
A circular saw, jigsaw, drill, impact driver, tape measure, and speed square cover 90 percent of the work. This toolkit costs $300 to $500 CAD if you are buying from scratch.
Conclusion
A camper van conversion in Canada is a project that pays for itself quickly in freedom, adventure, and the satisfaction of building something with your own hands. Start with the fundamentals, insulation, bed, and basic power and you will be sleeping in your own converted van sooner than you think.
Check out our related guides on van insulation for Canadian weather and the best solar setups for vanlife to go deeper on the most technical parts of your build.